Blocks Banner

The Honeymoon Quilt Block

The Honeymoon Quilt Block designed by Elaine Huff of Fabric406
The Honeymoon Quilt Block


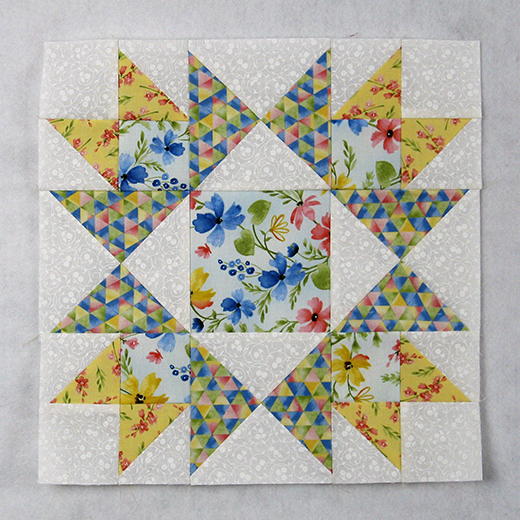
For quilters seeking a blend of traditional design and creative flexibility, the Honeymoon Quilt Block by Elaine Huff of Fabric406 presents an engaging project. This 12-inch finished block combines classic elements like half-square triangles and hourglass units, resulting in a versatile pattern suitable for various quilting endeavors.

A Star Block with a Unique Twist!
The Honeymoon Quilt Block is built using half-square triangles, hourglass units, and squares, making it an approachable yet visually dynamic pattern. The combination of these elements creates a striking star effect, perfect for adding movement and depth to any quilt.

Fabric Selection & Color Play:
One of the most exciting aspects of this block is its versatility in fabric choices. Elaine Huff’s tutorial showcases a mix of light, medium, and dark tones, creating contrast and dimension. Whether you opt for bold, high-contrast colors or soft, monochromatic hues, this block allows for endless creative possibilities.

Materials Needed:
To construct the Honeymoon Quilt Block, you'll require the following fabrics:
  • Light/White: 2 squares at 5.5", 4 squares at 3", and 4 squares at 2.5"
  • Medium 1/Floral: 1 square at 4.5" and 4 squares at 2.5"
  • Medium 2/Yellow: 4 squares at 3"
  • Dark/Triangles: 2 squares at 5.5"
  • fabric-406
These fabric choices allow for a harmonious blend of colors, enhancing the visual appeal of the block.

Construction Overview:
The assembly of the Honeymoon Quilt Block involves several key steps:
  • Half-Square Triangle Units: Combine the Light/White 3" squares with the Medium 2/Yellow 3" squares to create eight half-square triangle units. Trim each unit to 2.5" square.
  • Hourglass Units: Pair the Light/White 5.5" squares with the Dark/Triangles 5.5" squares to form four hourglass units. Trim each to 4.5" square.
  • Corner Units: Assemble each corner unit using one Light/White 2.5" square, two half-square triangle units, and one Medium 1/Floral 2.5" square. Sew these into two rows, press the seams, then join the rows to complete the corner unit. Repeat to make four corner units.
  • Block Assembly: Arrange the four corner units, the four hourglass units, and the Medium 1/Floral 4.5" center square in a nine-patch layout. Sew the units into three rows, press the seams toward the hourglass units, then join the rows to complete the block.
This structured approach ensures a cohesive and visually appealing block.

Design Variations:
One of the strengths of the Honeymoon Quilt Block lies in its adaptability. By rotating the hourglass units or experimenting with different fabric placements, quilters can achieve a variety of visual effects. For instance, rotating the hourglass units can create a pinwheel effect, while consistent placement emphasizes the star motif. Additionally, incorporating sashing or alternating blocks can further diversify the quilt's appearance.


Elaine Huff has provided a step-by-step Tutorial for this block, which is available on her Blog. The Tutorial includes detailed cutting instructions and assembly guidance.

The Honeymoon Quilt Block offers quilters an opportunity to explore traditional techniques while allowing room for creative expression. Its combination of half-square triangles and hourglass units provides a satisfying challenge, resulting in a block that's both classic and customizable. Whether incorporated into a larger quilt or used as a standalone piece, this block is sure to add charm and elegance to any quilting project.

Green Scrappy Mountain Majesties Quilt

Green Scrappy Mountain Majesties Quilt By Quiltville's Quips & Snips
Green Scrappy Mountain Majesties Quilt


If there's one thing many of us quilters have in common, it's a love of fabric scraps. Somehow, they multiply faster than we can sew them, filling bins and drawers with potential. That’s where Bonnie K. Hunter’s Scrappy Mountain Majesties quilt comes in—a brilliant, bold pattern that transforms leftover fabric into something striking, balanced, and breathtaking.

Designed by the beloved scrap-quilt queen herself, Bonnie Hunter of Quiltville's Quips & Snips, this pattern is a fantastic choice if you’re looking for a fun and flexible quilt project that celebrates color, texture, and improvisation—while still feeling structured and satisfying.

What Makes Scrappy Mountain Majesties So Special?
This quilt block looks much more complex than it is. Using simple half-square triangles (HSTs), Bonnie shows us how to turn ordinary 8.5" fabric squares into dramatic mountain-like peaks and valleys. You’ll be amazed at how quickly it comes together once you start playing with layout options.

Key highlights:
  • Made from 8.5" squares (great for scraps or fat quarters)
  • Uses a clever cut-and-swap technique to create mountain imagery
  • Multiple layout possibilities: zigzags, diamonds, chevrons, and more!
  • No need for sashing—just assemble blocks and watch your quilt grow

Materials & Cutting
Bonnie’s instructions are wonderfully detailed. Here’s a general idea of what you’ll need:
  • Fabric: 8.5” squares from your stash (make sure you cut them into pairs)
  • Rotary cutter & ruler
  • Sewing machine and neutral thread
  • Iron and pressing surface

Start with two squares of contrasting fabrics. Bonnie walks you through turning them into half-square triangles, then slicing and rearranging them to form the signature mountain shape.

This is a perfect project to use up scraps from previous quilts, especially those fabrics you couldn’t bear to part with. Since there’s no dominant color or strict placement, everything goes—and yet it all works together beautifully.

Layout Possibilities:
One of the most exciting things about the Scrappy Mountain Majesties quilt is the layout freedom it allows. You’re not locked into just one design.

Bonnie suggests a few ideas in her tutorial:
  • Zigzag/chevron
  • Diamond settings
  • Vertical or horizontal rows
Want more movement? Mix light and dark values intentionally. Prefer calm and uniformity? Stick to a limited color palette. The mountains adapt to whatever vision you have in mind.

Assembly Tips:
Even though the technique is straightforward, a few thoughtful touches make the process smoother:
  • Chain piece the HSTs for efficiency.
  • Finger press first, then give a good final press with steam.
  • Lay out your blocks before sewing rows together—it helps you visualize the final result and rearrange if needed.

Why I Love This Pattern:
What makes the Scrappy Mountain Majesties quilt so fun is the balance between freedom and form. You get to play with your scraps, be spontaneous with color choices, and yet the final result always feels cohesive and artistic.

It's a perfect weekend project or a long-term stash buster. And because it scales so easily, you can make anything from a cozy lap quilt to a dramatic bedspread.


So Ready to make your own mountain-inspired masterpiece?
Head over to Bonnie’s tutorial here: Scrappy Mountain Majesties Pattern


    Whether you're a seasoned scrap quilter or just dipping your toes into the world of string and stash quilts, the Scrappy Mountain Majesties quilt is a satisfying journey worth taking. It's creative, calming, and utterly rewarding—and best of all, it's a free pattern from one of quilting’s most generous educators.

So gather those scraps, pick a layout that speaks to you, and start climbing your own mountain of memories and fabric. 
Update cookies preferences