Blocks Banner

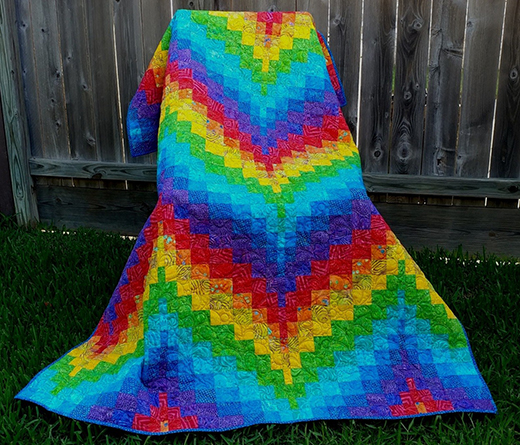
Landlocked Sea Lover’s Quilt

Disappearing four patch Quilt designed by Andie Johnson Sews, The Pattern by Cindy Sharp of Tops to Treasures
Disappearing four patch Quilt by Andie Johnson Sews

If you're a quilting enthusiast looking for a creative and visually striking project, the Disappearing Four Patch Quilt designed by Cindy Sharp of Tops to Treasures is a beautiful and rewarding option to explore. Featured in the "Landlocked Sea Lover’s Quilt" pattern, this design brings together traditional quilting techniques with a modern twist, offering both simplicity in construction and complexity in appearance.

The magic of the Disappearing Four Patch lies in its transformative process. What begins as a humble four-patch block quickly evolves into a dynamic and intricate design through a clever method of slicing and rearranging. Cindy Sharp expertly uses this technique to craft a quilt that mimics the motion and rhythm of the sea, making it a perfect choice for quilters who feel a connection to nautical themes—even if they live far from the coast.

This quilt finishes at a generous 80" x 98", making it ideal for a bedspread or a statement throw. The step-by-step instructions provided in the original PDF pattern walk you through assembling four-patch blocks, precisely cutting them, and rotating the segments to create the signature disappearing effect. It’s an accessible technique that offers stunning results, even for intermediate quilters.

Cindy’s choice of color palette and fabric layout gives the quilt a sense of movement, reminiscent of waves or sea breezes. However, the pattern is highly adaptable, allowing you to personalize it with your own fabric selections to suit any style or season. Whether you prefer soft pastels, bold brights, or traditional prints, the Disappearing Four Patch will showcase your fabrics beautifully.

This quilt design also incorporates thoughtful border work, adding structure and finishing touches that frame the patchwork center in a visually pleasing way. The end result is a quilt that looks far more complex than it actually is, which makes it especially satisfying to complete.

Whether you’re making this quilt for your own home, as a thoughtful handmade gift, or simply to explore a new quilting technique, the Landlocked Sea Lover’s Quilt offers a fulfilling project. Cindy Sharp’s approachable design and clear instructions ensure that quilters of varying skill levels can enjoy the process and feel confident as they sew.

The Landlocked Sea Lover’s Quilt pattern is available as a free PDF download from Moda Fabrics:


This comprehensive guide includes all necessary measurements, fabric requirements, and assembly instructions to help you successfully complete the quilt.

3 Steps to Make Bargello Quilts

Bargello Quilt Basics: 3 Steps to Bargello Quilts by Carol Thelen of Quilt Notes
3 Steps to Bargello Quilts

Have you ever been captivated by the rhythmic flow and movement of a Bargello quilt? These visually stunning creations often appear intricate and complex, but thanks to Carol Thelen of Quilt Notes, the mystery behind Bargello quilting becomes beautifully accessible. In her tutorial titled “Bargello Quilt Basics: 3 Steps to Bargello Quilts”, Carol breaks down this dazzling technique into a clear, manageable process that any confident beginner or seasoned quilter can follow.

If you’ve been curious about diving into the world of Bargello quilts but have hesitated due to their seemingly elaborate designs, this tutorial is a wonderful place to start.

What Is a Bargello Quilt?
Bargello quilts are known for their undulating wave-like patterns and dramatic visual flow. Inspired by a type of needlework embroidery from Florence, Italy, Bargello quilts are pieced from strips of fabric arranged in a way that creates stunning vertical or diagonal curves—no curved piecing required!

The technique relies on color gradation, precise strip piecing, and a little clever slicing and rearranging.

Carol Thelen's 3-Step Approach:
In her helpful tutorial, Carol Thelen simplifies the process into three clear steps:

1. Sewing Fabric Strips Together:
Begin by choosing a collection of fabrics with a natural color progression—light to dark, warm to cool, or from one hue to another. Sew these fabrics together into a strip set. This becomes the foundation of your Bargello quilt.

2. Creating a Tube and Subcutting:
After sewing the strips into a large panel, you’ll sew the first and last strips together, forming a tube. From this tube, you’ll subcut vertical strips of equal width. Each of these strips contains one segment of every fabric in your strip set, creating the color variation necessary for the Bargello effect.

3. Seam Ripping and Rearranging:
This is where the magic happens. By carefully seam ripping a specific seam in each strip and repositioning them so the colors "shift," you'll begin to see the characteristic curves take form. Arrange the strips in the correct order, sew them together, and voilà—your Bargello quilt top emerges!

Fabric and Design Tips:
  • Choose fabrics with strong contrast to emphasize the movement.
  • Keep values consistent across each strip set to avoid muddy transitions.
  • Start small! Try a Bargello table runner or wall hanging if you’re new to the technique.
Carol encourages quilters to take their time in planning and laying out their strips—this part of the process truly makes the design sing.


    Carol Thelen provides detailed instructions, helpful images, and thoughtful tips in her post. Whether you’re aiming for a small project or a full-size quilt, this tutorial sets you up for success:

Final Thoughts!
The beauty of Bargello lies in its illusion of complexity—yet with the right approach, it becomes surprisingly achievable. Carol Thelen’s tutorial strips away the fear and reveals a structured, creative process perfect for quilters ready to try something bold and exciting.

If you’ve been looking to challenge your piecing skills or simply want to create a quilt that feels like art in motion, the Bargello technique might just be your next favorite adventure.

Happy stitching—and may your fabric always flow in beautiful waves!

Barn Raising Log Cabin Quilt

Barn Raising Log Cabin Quilt Free Pattern
Barn Raising Log Cabin Quilt By Amishspirit

The Barn Raising Log Cabin Quilt is a traditional pattern that beautifully plays on the contrast between light and dark fabrics to create a striking visual impact reminiscent of traditional barn-raising gatherings. This Pellon Projects pattern is a comprehensive guide suitable for quilters of all skill levels, from beginners to veterans.

Materials Needed:
The pattern accommodates many quilt sizes, ranging from crib to king, and provides exact fabric specifications for each:

Light Fabrics (Variety):
  • Crib (48" x 48"): 6 Fat Quarters or 1⅜ yards
  • Lap (48" x 64"): 8 Fat Quarters or 1⅞ yards
  • Twin (68" x 96"): 14 Fat Quarters or 3½ yards
  • Full (80" x 96"): 18 Fat Quarters or 4⅜ yards
  • Queen (96" x 96"): 25 Fat Quarters or 6¼ yards
  • King (120" x 120"): 29 Fat Quarters or 7⅛ yards
  • Dark Fabrics (Variety):
  • Crib: 7 Fat Quarters or 1⅝ yards
  • Lap: 9 Fat Quarters or 2⅛ yards
  • Twin: 17 Fat Quarters or 4¼ yards
  • Full: 21 Fat Quarters or 5¼ yards
  • Queen: 26 Fat Quarters or 6⅜ yards
  • King: 35 Fat Quarters or 8⅝ yards

Center Squares:
  • Crib: 1 Fat Quarter or ¼ yard
  • Lap: 2 Fat Quarters or ⅜ yard
  • Twin: 2 Fat Quarters or ½ yard
  • Full: 3 Fat Quarters or ⅝ yard
  • Queen: 3 Fat Quarters or ¾ yard
  • King: 4 Fat Quarters or 1 yard
  • Backing and Binding:
  • Backing and binding needs vary by quilt size; refer to the pattern for yardage and cutting dimensions.
  • Batting:
  • Eco-Cotton Blend™ Batting IB -96" or 120" width, yardage varies by quilt size.
  • Tools:
  • Rotary mat, rotary cutter, rotary ruler, sewing machine, and accessories.

Cutting Instructions:
Each block has a center square (Piece A) and a group of strips (Pieces B through H) that are attached in a specific order:
  • Piece A: Cut 2½" square (center).
  • Piece B: Cut 2½" x 1½".
  • Piece C: Cut 3½" x 1½".
  • Piece D: Cut 4½" x 1½".
  • Piece E: Cut 5½" x 1½".
  • Piece F: Cut 6½" x 1½".
  • Piece G: Cut 7½" x 1½".
  • Piece H: Cut 8½" x 1½".
Cut one light and one dark fabric for each piece. Cutting on the straight grain along the longer side stabilizes the edges of the blocks, causing the finish to lie flatter.

Assembly Instructions:
Center Square:
  • Begin with Piece A (2½" square) as the center.
Adding Strips:
  • Stitch Piece B (light) to one side of the center square; press toward Piece B.
  • Add Pieces C through H in sequence, alternating light and dark fabrics, and pressing after each addition.

Block Completion:
  • The block should be 8½" square, including seam allowances, after adding all strips.

Quilt Assembly:
  • Arrange completed blocks in the Barn Raising pattern, starting in the center and working outwards.
  • Sew blocks together into rows, then sew rows together to complete the quilt top.

For visual step-by-step instructions, refer to the official pattern from Pellon Projects: Barn Raising Log Cabin Quilt Pattern (PDF)

Design Tips:
Fabric Choice: Choose fabrics with strong contrast between light and dark to get the most visual impact from the Barn Raising pattern.
Color Coordination: Use either the same color family for a coordinated look or mix and match various prints for a scrappy, dynamic look.
Pressing Seams: Pressing to the dark side consistently helps with flatter blocks and easier construction.

Final Thoughts!
The Barn Raising Log Cabin Quilt pattern is a traditional favorite that delivers simplicity and visual interest. Its graphic design lends itself to creative freedom in fabric selection and color placement. It is suitable for either the beginner who wants a project that is easy to handle or the more experienced quilter who enjoys a time-honored pattern. The pattern gives a rewarding experience for quilters.

Zig Zag Strips Quilt

Zig Zag Strips Quilt Free Pattern designed and written by Lisa Sutherland of Quilt Jubilee
Zig Zag Strips Quilt

Every now and then, a quilt pattern comes along that balances charm with just the right amount of visual motion. Pansies in Zig Zag Strips by Lisa Sutherland of Quilt Jubilee is exactly that kind of quilt. It takes the timeless appeal of floral prints—particularly cheerful pansies—and combines them with a bold zigzag layout that adds a modern edge to this traditional motif.

What’s so appealing about this pattern is its simplicity in construction paired with the visual energy it delivers. Whether you're working with a stack of florals from your stash or a curated bundle you’ve been saving for something special, this pattern is an ideal match.

Let’s dive into the details of this delightful project and explore how you can bring it to life in your own quilting studio.

About the Pattern:
The Pansies in Zig Zag Strips quilt is constructed using basic strip piecing techniques, making it a great option for confident beginners or seasoned quilters looking for a fast and satisfying project.

Finished Quilt Size: 52" x 70"
Techniques Used:
  • Strip piecing
  • Straight-line cutting and sewing
  • Basic block arrangement
The quilt's name highlights its primary visual theme: floral strips arranged in a zigzag or chevron pattern across the quilt top. This clever layout creates movement while keeping construction straightforward.

Fabric Selection:
The original design highlights pansy-themed fabrics, but this pattern is wonderfully versatile. You can:
  • Use floral jelly rolls or strip sets
  • Mix contrasting solids or tone-on-tones for a modern twist
  • Play with ombre fabrics for a gradient effect through the zigzags
The alternating direction of the strips helps break up the pattern just enough to keep the eye moving and the quilt lively.

Construction Highlights:
Creating the quilt involves sewing strips together, sub-cutting them, and arranging the pieces to form a zigzag layout. The process is simple but results in a dynamic quilt top. It’s perfect for:
  • Weekend sewing sessions
  • Group sewing projects
  • Quick gifts or seasonal throws
You’ll find that the rhythm of cutting and sewing strips is not only beginner-friendly but also meditative—an enjoyable break from more complex piecing patterns.

Design Tips:
  • Add a coordinating border to increase the size and frame the design.
  • Experiment with light and dark contrast between strips to emphasize the zigzag effect.
  • Use a large floral print backing to complement the front and tie the theme together.

The Pansies in Zig Zag Strips quilt is a beautiful blend of floral sweetness and graphic style. Whether you're sewing it up for spring décor, a thoughtful gift, or just for the joy of working with pretty fabrics, this quilt offers both ease and elegance. It’s proof that sometimes the simplest patterns create the most striking results.

Happy quilting, and may your stitches always be straight and your bobbins full! 

You can download the Pansies in Zig Zag Strips quilt pattern for free from Quilt Jubilee’s website: Zig Zag Strips Quilt Pattern

Whirlwind Quilt Block

Whirlwind Quilt Block Free Tutorial designed by Elaine Huff of Fabric 406
Whirlwind Quilt Block

The Whirlwind Quilt Block, designed by Elaine Huff of Fabric 406, is a dynamic and visually engaging pattern that adds movement and flair to any quilting project. Also known by names such as Modern Envelope, Twin Sisters, and Water Wheel, this block offers versatility in design and construction.
fabric-406

Materials and Fabric Selection:
To create the Whirlwind Quilt Block, you'll need four fabrics:

Light Fabric: 1 strip measuring 4" x width of fabric (WOF)

Green Fabric: 1 strip measuring 1.5" x WOF

Brown Fabric: 1 strip measuring 1.5" x WOF

Red Fabric: 1 strip measuring 1.5" x WOF

These fabrics are sewn together to create a strip set, which is then cut and assembled into the Whirlwind pattern. 

Construction Methods:
Elaine Huff introduces two approaches for constructing the Whirlwind Quilt Block, offering flexibility in technique.

Strip Piecing Method: Start by sewing together four fabric strips—Light, Green, Brown, and Red—along their long edges. Press the seam allowances away from the Light strip, ensuring a smooth transition between colors. Cut the sewn strip set into squares of equal width, then slice each square diagonally from corner to corner in the same direction to form triangles. Arrange four of these triangles to create the Whirlwind pattern and stitch them together. For a refined finish, press the seams using the tweak/twirl/furl method to maintain a flat, crisp appearance.

Individual Pieced Triangles Method: Begin by cutting a 6" Light fabric square diagonally twice, yielding four triangles. Then, prepare the Green, Brown, and Red fabrics by cutting them into progressively longer strips. Sew these colored strips together and attach them to a Light fabric triangle to form pieced units. Repeat the process to create four identical units, then arrange and join them to complete the Whirlwind pattern.

Both methods provide distinct ways to construct this dynamic block, allowing quilters to choose the technique that best suits their style and precision preferences.

Design Versatility:
The Whirlwind Quilt Block's design allows for creative flexibility:

Color Variations: Experiment with different color combinations to achieve various visual effects.

Scrap Utilization: Use fabric scraps for a more eclectic and vibrant look.

Layout Options: Combine multiple blocks in different orientations to create unique quilt layouts.

This block's dynamic appearance makes it suitable for various projects, from full-sized quilts to decorative wall hangings.


Elaine Huff's comprehensive tutorial for the Whirlwind Quilt Block, including detailed instructions and step-by-step photos, is available for free on the Fabric 406 blog.
Update cookies preferences